RADAR SYSTEM USING ARDUINO
In this tutorial we'll learn about how to make a radar system using an Arduino Uno
OVERVIEW
In this Arduino Tutorial I will show you how you can make this cool looking radar using the Arduino Board and the Processing Development Environment. You can watch the following video or read the written tutorial below for more details.
All you need for this Arduino Project is an Ultrasonic Sensor for detecting the objects, a small hobbyist Servo Motor for rotating the sensor and an Arduino Board for controlling them. You can watch the following video or read the written tutorial below.
COMPONENTS NEEDED FOR THE PROJECT
You can get these components from amazon at a very reasonable price
- Ultrasonic sensor HC- SR04…….
- Servo Motor……………………………
- Arduino Board………………………..
- Breadboard and Jump Wires…..
BUILDING THE DEVICE
- First I made a cardboard stand for connecting the Ultrasonic sensor to the Servo motor. I folded it like it’s shown on the picture below, glued it and secured to the servo motor using a screw like this.
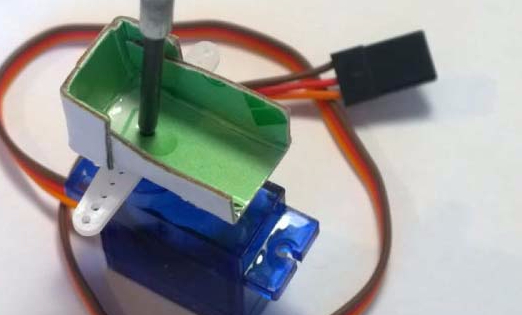
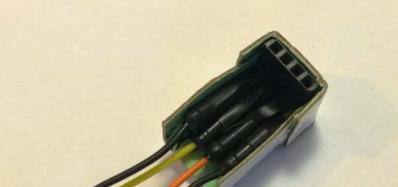
- Also I attached a pin header on which I soldered 4 jumper wires for connecting the sensor.
-
- Finally I secured the servo motor to the Arduino Board using an elastic band.
CIRCUIT SCHEMATICS
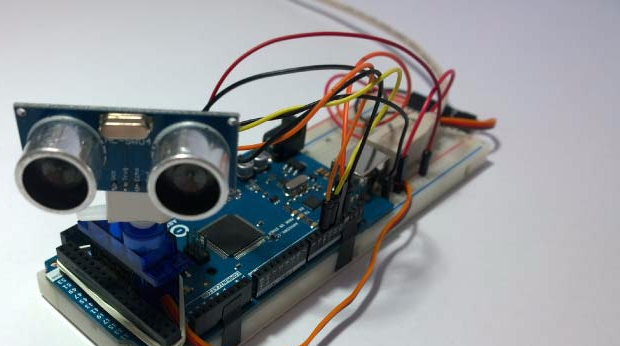
- I connected the Ultrasonic Sensor HC-SR04 to the pins number 10 and 11 and the servo motor to the pin number 12 on the Arduino Board.

SOURCE CODES
HERE'S THE SOURCE CODE FOR ARDUINO WITH DESCRIPTION FOR EACH LINE
- // Includes the Servo library
- #include <Servo.h>.
- // Defines Tirg and Echo pins of the Ultrasonic Sensor
- const int trigPin = 10;
- const int echoPin = 11;
- // Variables for the duration and the distance
- long duration;
- int distance;
- Servo myServo; // Creates a servo object for controlling the servo motor
- void setup() {
- pinMode(trigPin, OUTPUT); // Sets the trigPin as an Output
- pinMode(echoPin, INPUT); // Sets the echoPin as an Input
- Serial.begin(9600);
- myServo.attach(12); // Defines on which pin is the servo motor attached
- }
- void loop() {
- // rotates the servo motor from 15 to 165 degrees
- for(int i=15;i<=165;i++){
- myServo.write(i);
- delay(30);
- distance = calculateDistance();// Calls a function for calculating the distance measured by the Ultrasonic sensor for each degree
- Serial.print(i); // Sends the current degree into the Serial Port
- Serial.print(","); // Sends addition character right next to the previous value needed later in the Processing IDE for indexing
- Serial.print(distance); // Sends the distance value into the Serial Port
- Serial.print("."); // Sends addition character right next to the previous value needed later in the Processing IDE for indexing
- }
- // Repeats the previous lines from 165 to 15 degrees
- for(int i=165;i>15;i--){
- myServo.write(i);
- delay(30);
- distance = calculateDistance();
- Serial.print(i);
- Serial.print(",");
- Serial.print(distance);
- Serial.print(".");
- }
- }
- // Function for calculating the distance measured by the Ultrasonic sensor
- int calculateDistance(){
- digitalWrite(trigPin, LOW);
- delayMicroseconds(2);
- // Sets the trigPin on HIGH state for 10 micro seconds
- digitalWrite(trigPin, HIGH);
- delayMicroseconds(10);
- digitalWrite(trigPin, LOW);
- duration = pulseIn(echoPin, HIGH); // Reads the echoPin, returns the sound wave travel time in microseconds
- distance= duration*0.034/2;
- return distance;
- }
HERE's THE FINAL PROCESSING CODE OF ARDUINO RADAR
YOU CAN DOWNLOAD THE PROCESSING SOFTWARE FOR .PDE FILE AT PROCESSING.ORG
but you need to change the resolution of your code according to your display and the communication port to your device's port i am using com4 here for my computer
- /* Arduino Radar Project
- *
- * Updated version. Fits any screen resolution!
- * Just change the values in the size() function,
- * with your screen resolution.
- *
- * by Kunal Chaudhary
- *
- */
- import processing.serial.*; // imports library for serial communication
- import java.awt.event.KeyEvent; // imports library for reading the data from the serial port
- import java.io.IOException;
- Serial myPort; // defines Object Serial
- // defubes variables
- String angle="";
- String distance="";
- String data="";
- String noObject;
- float pixsDistance;
- int iAngle, iDistance;
- int index1=0;
- int index2=0;
- PFont orcFont;
- void setup() {
- size (1920, 1080); // ***CHANGE THIS TO YOUR SCREEN RESOLUTION***
- smooth();
- myPort = new Serial(this,"COM3", 9600); // starts the serial communication
- myPort.bufferUntil('.'); // reads the data from the serial port up to the character '.'. So actually it reads this: angle,distance.
- orcFont = loadFont("OCRAExtended-30.vlw");
- }
- void draw() {
- fill(98,245,31);
- textFont(orcFont);
- // simulating motion blur and slow fade of the moving line
- noStroke();
- fill(0,4);
- rect(0, 0, width, height-height*0.065);
- fill(98,245,31); // green color
- // calls the functions for drawing the radar
- drawRadar();
- drawLine();
- drawObject();
- drawText();
- }
- void serialEvent (Serial myPort) { // starts reading data from the Serial Port
- // reads the data from the Serial Port up to the character '.' and puts it into the String variable "data".
- data = myPort.readStringUntil('.');
- data = data.substring(0,data.length()-1);
- index1 = data.indexOf(","); // find the character ',' and puts it into the variable "index1"
- angle= data.substring(0, index1); // read the data from position "0" to position of the variable index1 or thats the value of the angle the Arduino Board sent into the Serial Port
- distance= data.substring(index1+1, data.length()); // read the data from position "index1" to the end of the data pr thats the value of the distance
- // converts the String variables into Integer
- iAngle = int(angle);
- iDistance = int(distance);
- }
- void drawRadar() {
- pushMatrix();
- translate(width/2,height-height*0.074); // moves the starting coordinats to new location
- noFill();
- strokeWeight(2);
- stroke(98,245,31);
- // draws the arc lines
- arc(0,0,(width-width*0.0625),(width-width*0.0625),PI,TWO_PI);
- arc(0,0,(width-width*0.27),(width-width*0.27),PI,TWO_PI);
- arc(0,0,(width-width*0.479),(width-width*0.479),PI,TWO_PI);
- arc(0,0,(width-width*0.687),(width-width*0.687),PI,TWO_PI);
- // draws the angle lines
- line(-width/2,0,width/2,0);
- line(0,0,(-width/2)*cos(radians(30)),(-width/2)*sin(radians(30)));
- line(0,0,(-width/2)*cos(radians(60)),(-width/2)*sin(radians(60)));
- line(0,0,(-width/2)*cos(radians(90)),(-width/2)*sin(radians(90)));
- line(0,0,(-width/2)*cos(radians(120)),(-width/2)*sin(radians(120)));
- line(0,0,(-width/2)*cos(radians(150)),(-width/2)*sin(radians(150)));
- line((-width/2)*cos(radians(30)),0,width/2,0);
- popMatrix();
- }
- void drawObject() {
- pushMatrix();
- translate(width/2,height-height*0.074); // moves the starting coordinats to new location
- strokeWeight(9);
- stroke(255,10,10); // red color
- pixsDistance = iDistance*((height-height*0.1666)*0.025); // covers the distance from the sensor from cm to pixels
- // limiting the range to 40 cms
- if(iDistance<40){
- // draws the object according to the angle and the distance
- line(pixsDistance*cos(radians(iAngle)),-pixsDistance*sin(radians(iAngle)),(width-width*0.505)*cos(radians(iAngle)),-(width-width*0.505)*sin(radians(iAngle)));
- }
- popMatrix();
- }
- void drawLine() {
- pushMatrix();
- strokeWeight(9);
- stroke(30,250,60);
- translate(width/2,height-height*0.074); // moves the starting coordinats to new location
- line(0,0,(height-height*0.12)*cos(radians(iAngle)),-(height-height*0.12)*sin(radians(iAngle))); // draws the line according to the angle
- popMatrix();
- }
- void drawText() { // draws the texts on the screen
- pushMatrix();
- if(iDistance>40) {
- noObject = "Out of Range";
- }
- else {
- noObject = "In Range";
- }
- fill(0,0,0);
- noStroke();
- rect(0, height-height*0.0648, width, height);
- fill(98,245,31);
- textSize(25);
- text("10cm",width-width*0.3854,height-height*0.0833);
- text("20cm",width-width*0.281,height-height*0.0833);
- text("30cm",width-width*0.177,height-height*0.0833);
- text("40cm",width-width*0.0729,height-height*0.0833);
- textSize(40);
- text("Object: " + noObject, width-width*0.875, height-height*0.0277);
- text("Angle: " + iAngle +" °", width-width*0.48, height-height*0.0277);
- text("Distance: ", width-width*0.26, height-height*0.0277);
- if(iDistance<40) {
- text(" " + iDistance +" cm", width-width*0.225, height-height*0.0277);
- }
- textSize(25);
- fill(98,245,60);
- translate((width-width*0.4994)+width/2*cos(radians(30)),(height-height*0.0907)-width/2*sin(radians(30)));
- rotate(-radians(-60));
- text("30°",0,0);
- resetMatrix();
- translate((width-width*0.503)+width/2*cos(radians(60)),(height-height*0.0888)-width/2*sin(radians(60)));
- rotate(-radians(-30));
- text("60°",0,0);
- resetMatrix();
- translate((width-width*0.507)+width/2*cos(radians(90)),(height-height*0.0833)-width/2*sin(radians(90)));
- rotate(radians(0));
- text("90°",0,0);
- resetMatrix();
- translate(width-width*0.513+width/2*cos(radians(120)),(height-height*0.07129)-width/2*sin(radians(120)));
- rotate(radians(-30));
- text("120°",0,0);
- resetMatrix();
- translate((width-width*0.5104)+width/2*cos(radians(150)),(height-height*0.0574)-width/2*sin(radians(150)));
- rotate(radians(-60));
- text("150°",0,0);
- popMatrix();
- }
So ! this was the whole tutorial on RADAR SYSTEM i hope you liked it
if any issues come up you can contact me through my email id -- kc297.0201@gmail.com or my whatsapp number -- +918107030018
Copyright ARDUINO TUTORIAL